I learnt to sail on an old gravel pit in the Midlands in the UK. Just to make it more interesting, Tamworth Sailing Club also had islands and trees. These features created some rather interesting wind shifts that were worth using so I quickly learned the importance of tacking efficiently. Later when team racing with Aston University’s BUSA winning team, it became clear that tacking well made you a tactical genius.
I think I have probably taught more crews to tack, than I care to remember. Team Racing in the Royal Navy with a regular crew meant finding a keen youngster, teaching him/her how to tack, then finding that they were posted back to sea just as the team work had been perfected. To help me and the new, already shell-shocked crew through the difficult settling in period, I found that going back to first principles was the best place to start.
The philosophy of tacking which we would commonly go over would put the basics into perspective. These principles work for single handed or double handed dinghies.
Tacking Philosophy:
1st Principle: That the speed of the craft prior to the tack should be converted into distance to windward. Commonly I see people trying to get their boat to the other tack as quickly as possible with no consideration for cheating the wind.
2nd principle: The rudder should follow the turn set up by the weight distribution, movement and the sail trim, rather than induce it. Less rudder action means less speed reduction into the tack.
3rd Principle: That any acceleration induced by the final pull up should be at the optimum rate to give maximum speed. You may find some boats are so stable that they correct themselves too quickly; these boats require some active counter weight techniques to slow the pull up of the boat. I think of the 2000 as an example of this type of boat, especially with its smaller mast length and sail plan.
These principles are perhaps obvious, but with a little more investigation and application of some basic scientific principles, we can develop the reasons behind why some can tack more efficiently with what seems less effort.
I will be breaking down the tack itself into easily determinable key stages:
- The Luff to Head To Wind
- The Pump to Windward
- The Sail Trim
- The Pull Up
At each stage I will be considering angular momentum, apparent wind, the rudder and sail trim. However, I have not limited the discussion to any craft in any breeze condition.
Let's take the first part of the tack for example:
Since we are not allowed to come out of the tack faster than we go in, there must be a way of reducing the losses caused by the slowing of the boat into the tack. Commonly we are tacking because of a shift that allows us to sail closer to the ideal direction of the next mark. However, if the tack is not efficient then often we find that it might be as well to carry on to the layline for the mark. The key to the efficiency of the tack is in the first stage. When coaching a group of sailors, Chris Gowers' used a great vector diagram to show how important this part of the tack was. If we can turn to head to wind without losing speed, then we are 1.4 times faster than on the tack. This is because if we draw a vector line representing our speed on a tack - then swing it to head to wind - then the head to wind line is 1.4 times larger in the direction of the wind than the vector on the tack. So it's this part of the tack that I try to use to pinch something back from the potential loss by tacking.
Phase 1 - The luff to head to wind.
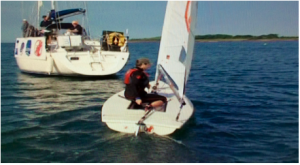
This part of the tack should not be a push with the rudder. In fact it could be said that the rudder plays no part in the tack at all, but it is probably used to control the rate of turn rather than induce the turn. If the boat is at maximum speed prior to the tack, the feel on the rudder should be neutral. Now to begin our tack, we must not repeat not push the rudder!!!!! Try to relax your grip on the extension - let it follow you rather than you steer it. (A good Laser/ILCA Rooster Carbon Tiller Extension should help as they are super grippy anyway). So how do we get the boat to begin the tack? Simply over trim the main sheet slightly, under sheet the jib slightly and if needed, a tiny, repeat tiny bit of leeward heel. The centre of effort of the sails will then have moved back behind the hulls pivot point and the boat will naturally want to begin to luff to windward - let your rudder follow it. Don't get too excited and want to move just yet. Be patient.

As the boat progressively sails closer and closer to the wind there are more things to consider:

If the helm and crew are not conscious of the balance of the boat it will begin to heel to windward very soon, which if not corrected, will be trying to send the boat back away from the wind. A common mistake is to start your roll to windward too soon. Doing this would require the use of more rudder to keep the turn going (which would slow you down), due to the natural shape of the boat trying to turn the boat away from the wind. So ensure you are actively trying to help the boat round towards the wind by reducing your leverage if required.
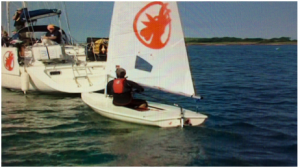
Assuming the boat is steadily turning to windward, then the bow of the boat will experience a continual lift due to the new turning apparent wind. This turning lift is often overlooked and is a real helping hand in sailing to head to wind. You may have noticed that sometimes when you tack the tell tails tell you there is a lift just as you start to tack. This is the turning wind.

When finally you get to head to wind, the jib or luff will back. On a single hander such as the laser - I call the jib the portion of the sail in front of the window.
Phase 2 then starts.
If you followed phase 1 correctly, then the boat will still be almost upright and the crews weight will be further in the boat than the norm for the conditions and the main should be in tight.
A quick technical thingy we will consider in this phase of the tack is angular momentum. Without going into the physics of it, just think about how an ice dancer speeds up a turn on the spot by pulling his/her arms into her body (or the center of the point of the turn).

The centre of this point in a boat when tacking is over your shoulder, somewhere about 90 degrees to your boats direction. If the weight in the boat were to move to the centre of the turning point to the old windward deck, then the speed of the turn will speed up. However, if the crew move to the centre of the turning point before the boat has began to turn, then nothing happens. This is why we should wait for the boat to start its turning to head to wind before we make our move to the centre of the circle. Thankfully if we have carried out stage 1 of this tack correctly, then the angular momentum part of stage 2 will work even better. Remember the sailors have moved their weight into the boat as the boat headed up. This has actually increased angular momentum and has stored up loads of it ready for the reduction in stage 2.
Sorry about that bit but here we are back thinking about stage 2 of the tack. Stage 2 begins when the jib backs, or for single-handed sailors, when the first third of the sail backs. I really do mean backs rather than lifts! Now a pump to windward does a number of things:
- The angular momentum is reduced and so the boat spins around the sailor.
- The pump to windward at this stage means that only the main or back 2/3rds of the sail pulls in the pump to windward, which again turns the boat effectively. Note, the mainsail should be in tight at this stage to increase leach tension to help this effect.
- As there is less sail filling in this part of the turn, the pump to windward is made easier, with less effort by the sailors.

All this adds up to little requirement for the use of the rudder to complete the turn, which is of course the one thing that if used would be a break, slowing the boat down. You may see the rudder used in both pictures and the video on the Boat Whisperer Upwind DVD/Download product - so I should say that the rudder is not being positively pushed but that it is actively following where the boat wants to go.
Phase 3 is the move across the boat to pull it back to flat giving it the required acceleration on the new tack.
Now for those of you who are feeling a little vulnerable thinking about the heel to windward and the problems of crossing the boat to get it flat before you fall in, read through this little parable. I heard it first told by Cathy Foster (1st lady 470 Olympian when sailing against men) :
One no wind day, Cathy gave a class of youth sailors a little game. The task was to move underneath a table from one side to the other in the quickest time. The only rule was the table top had to remain above the legs. Remarkably it did not take the competitive youngsters to realise that if they turned the table onto 2 legs, then they could stand up to move under the table rather than crawl across which had hurt their knees. Another was sharp enough to see the reason behind the exercise, which was to show them that a heeled boat makes it easier to move under the boom quickly than a flat boat.

I'm never sure if this parable is really true, but the concept is, if the boat is heeled then it saves sore knees and bent backs.

To add extra heel to the boat before the sailors move, the sails should be sheeted in. Commonly I used to say to the crew to sheet in the jib on the new tack before we both crossed the boat together. If the boat is pulled up before both sails are set, then all that happens is the main is the only one pulling correctly as the jib is simply blown across the boat. This is not quick!
Sheeting in also helps the extra heel in light winds. If you don’t sheet in at this stage the boat will naturally come upright too fast with little or no acceleration. In a Laser I use my aft hand to grip and pull the deck to me - rather than take me to the deck. This adds some extra heel. In many two man boats I try and find a toestrap or something to haul the boat over as I cross the boat. Now the one problem with sailing many different boats is adapting to the different stability of the hull/rig. Some boats are super stable and require lots more energy to get them to heel at all. Others only need the slightest movement to induce a large heel.
The movement from the leeward part of the boat to the new windward side will also help the boat heel yet a little more, good old fashioned action and reaction for those of you who remember your physics lessons.
Now the final Stage -4: The pulling up, acceleration bit.
Remember, the boat has been heeled by the combination of the first pump at the start of the tack, together with the sails trimmed in and the reaction of the crew moving.
The rate of the turn of the boat will also be reduced by the crew moving back across the boat (increasing angular momentum, or ice dancer moving her arms out). This should reduce the requirement for the rudder to stop the rate of turn.

Lets consider the new apparent wind on the sails in the pull up. As you can imagine, the new apparent wind will be a large lift on both sails. Commonly I try to ease the sails slightly to help the new apparent wind work effectively on the sails rather than stall them.

This pull up process has an optimum rate - too long and the boat slips sideways, too short and the boat does not have time to accelerate. The easing of the sails and the movement of the crew regulate the speed of the pull up.

The last and final stage of the tack is the sailing on the tack bit. As the speed reaches maximum, the sails are sheeted in hard to compensate for the increased and slightly headed relative breeze now you are at full speed at the end of the tack.
 We must ensure that we move back into the boat in time, to prevent the boat from going past the upright position; this would result in the rudder being pushed to keep the boat on course. The heavier the rig is, the more the crew have got to move back into the boat to counteract the weight of the rig continuing over to windward.

When I am trying to help others to improve their roll tacks, I like to show them how stable their boat actually is. I encourage them to remain in the pre pulling up position for as long as possible. I also think it is a good idea to gain an understanding of the balance point of the boat. For example, the Laser's balance point is quite different for a 4.7, Radial, Standard. Actually I am not sure that I have ever managed to find the balance point in a 4.7 in light winds as the rig is just not heavy or long enough to help tip the boat without help from wind.
You may also like to seriously slow the tack down to show you how stable the boat is. Do not cross until the boat is heeled enough.
And now a normal speed tack. (Note how much sail is backing before I move to the centre of the circle)
Here in light winds but also more waves:
Now with more waves and more wind - it becomes harder to give the boat as much roll to windward as you might like. In this instance I start to give the boat an impulse.
Lastly a repeat of the first tack in a Scorpion. I guess I was proud of this one as there is so little wind. I love the way the wind in the slot blows Sarah's hair at the end of the tack.
If you have problems tacking or want to improve, please send me a link to your tacks on YouTube and I can give you a critique. I'll try to be honest and constructive. What have you got to loose??
Steve






 Select Store
 EU
EU
 US
US
